

So as I am cleaning out my sewing room, I came across my stash of wool. I feel like my wool days are over and added it to the pile of things to give to my guild.

This piece of ticking was stuck in with my wool. Then I remembered why I put it there......

I heard of people making rugs using their wool scraps that they sewed on to a piece of ticking, using the lines as a guide. So I cut up some wool approximately 1" x 3". I did not measure just eyeballed it. Threw them in this bin and mixed them up. Next, sew some wool strips all along the outside edge of your rug, the same way you would do a border on a quilt. {no picture}. I used 4" strips. You will use this as a facing to finish the edge and sew it to the back after you make your rug.

To start, working from the top down, take a strip starting in the middle of your rug and work to the right if you are right handed.
Fold the strip in half to find the middle and place it on a ticking stripe {see above}. This sounds way more confusing than it is.
Sew all the way down one ticking stripe and then.........

fold your first row over and about 1/4" away start your next row. You can use the red or the white stripes it doesn't matter. Not all of mine are exactly 1/4" but you don't want too much space or the ticking will show.
Finish the one side, turn your rug and finish the other side.
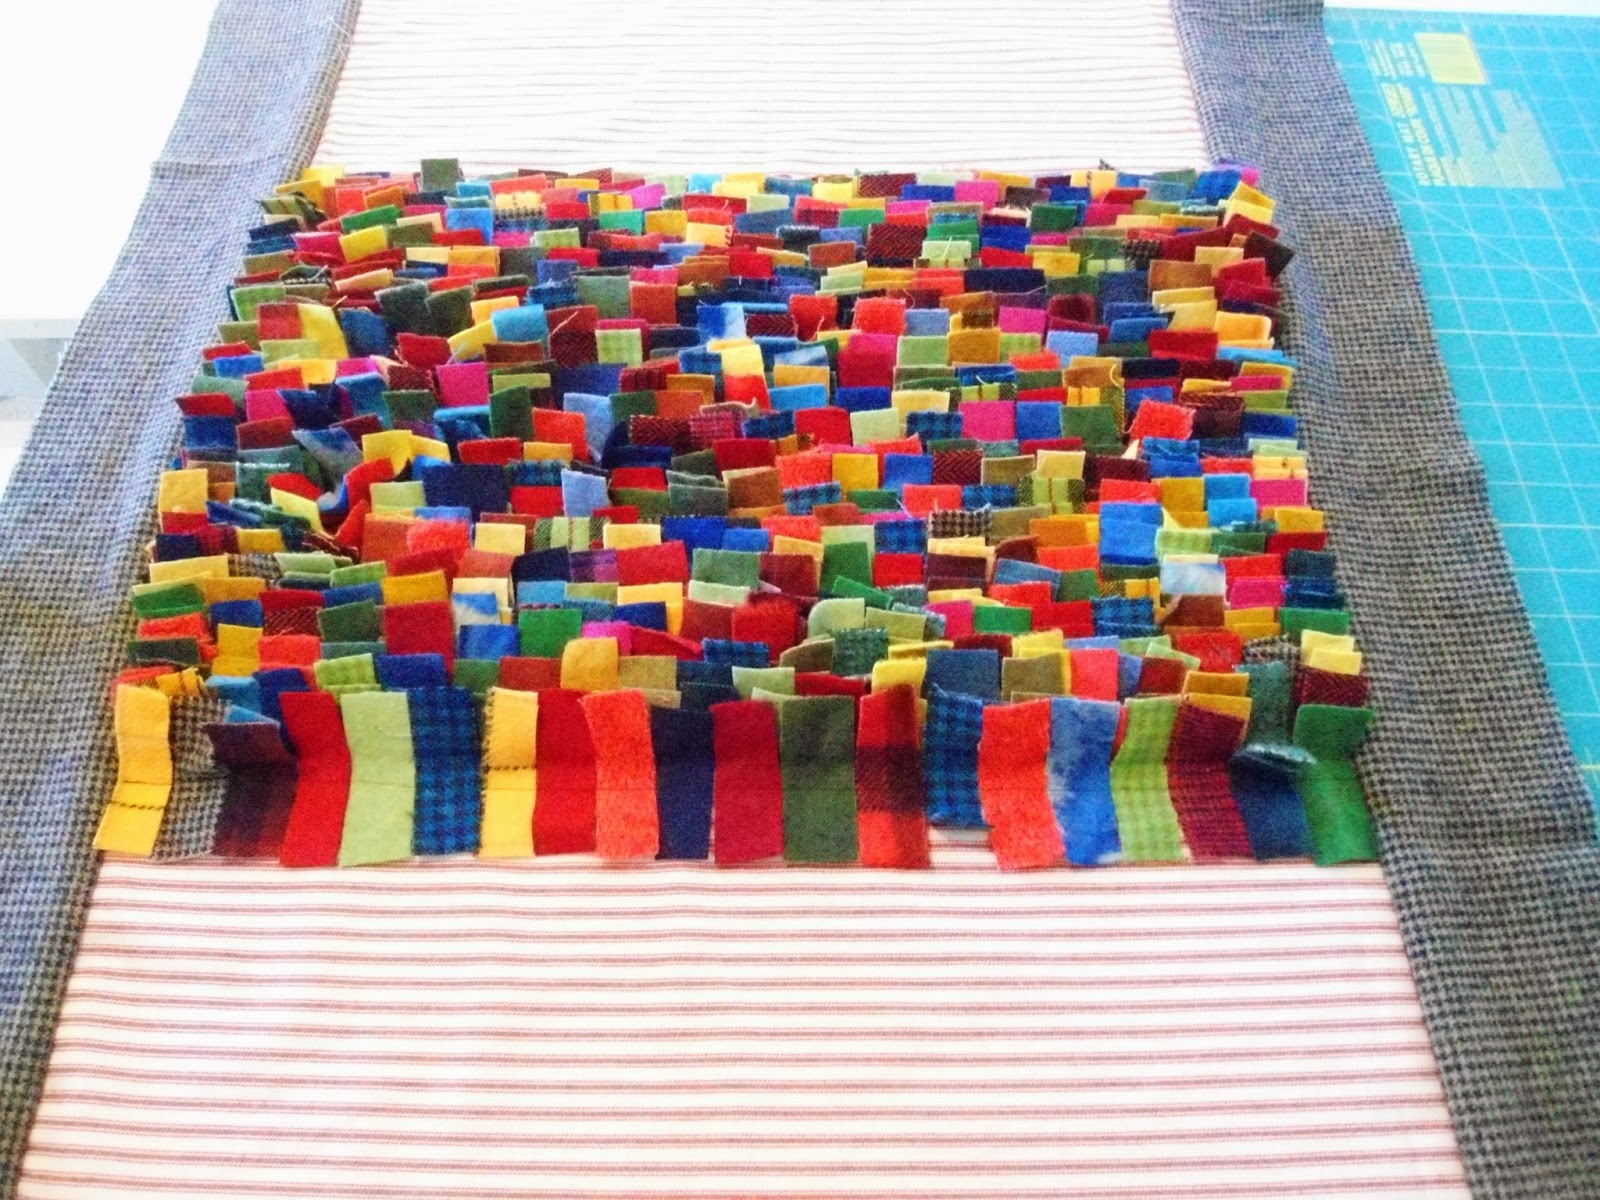
Here is mine so far, you can now see the facing strips on the sides. This is a perfect project for a retreat as you don't have to think too much at all.
There is a lot of hand dyed wool in here which adds some nice color, I didn't want a drab dark colored rug.
It is a small throw size, about 26 x 36 ,each stripe took about 20 strips, all types of wool were used. This is very free form so don't stress about the sizes of the strips. The more varied the better it will look.
Kelly
I love this! Super cute!
ReplyDeleteI've never seen anything like this - how clever!
ReplyDeleteI am in love. Really. I love wool. For some reason, the last few years I love hand made rugs. I think I might have to cut up some wool scraps and give this a try. Thanks for sharing.
ReplyDeletevery interesting, will want to see it when you are done! I'm not big on wool, wonder if this would work with cotton? Perhaps not? Anyway, it is a fun project!
ReplyDeleteHugs, Mickie
looks great!
ReplyDeleteOh, this is so clever and very cute! Good idea too. I have a ton of wool in boxes and this might be a good use for some of the less-lovable pieces. Thanks for the tutorial!
ReplyDeletep.s. love all the bright colors you're using!
I'm just falling in love with dyed wools so I'm a while away from wanting to use them up. This is such a great project though and looks wonderful in your bright colours! I've seen it done with cotton that has been folded over. I'd love to see some of your wool projects if you feel like showing them :)
ReplyDeleteKelly, That's so clever! I love the idea and this one is going to make a beautiful rug! I do have some wool but hardly enough to make a rug. May be a mug rug :)
ReplyDeleteWhen I saw the first photo I couldn't figure out how you had made all your wool stand up. Now I see. Interesting fun project.
ReplyDeleteI have not seen this before. It looks great.
ReplyDeleteClever and lovely!
ReplyDeleteLooks like fun. I've never seen this before. I bet it will feel wonderful on your feet!
ReplyDeletegreat rich colors.
I ended up giving all my wool away when I moved....rethinking that now :)
You are fearless!
ReplyDeleteThat is so striking and what a great way to make a rug - have not seen that done before. Have so enjoyed looking round your blog at all your quilts - I could look at quilt photos all day! Thanks for sharing. xCathy
ReplyDeleteVery clever and such happy colours, Kelly! Now I'll be on the lookout for pretty wools... ;o)
ReplyDeleteI LOVE this! Thank you for the tute. It looks addictive!
ReplyDeleteReading your posts backwards, i wasn't quite sure what was going on with the rug...now I get ti! How clever!!!
ReplyDeleteThank you!!
ReplyDeleteWe have an old rug made by my great grandmother that I could never figure out how she made. Now I know!
Yours is beautiful, and must feel good under your bare feet.
Ah! Now I see how you made this rug! So neat! It's a clever way to easily sew it together, and a great way to use up wool scraps. I've never bought one piece of wool, except to sew suits (!), so there won't be one of these at my house. 😞
ReplyDeleteTấm thảm bạn làm rất cầu kỳ và khiến tôi rất thích, mời bạn xem các thông tin hữu ích sau >> Điều trị chảy máu chân răng
ReplyDelete