KNOWLEDGE IS POWER, BUT IT DOESN'T MAKE MY BLOW DRYER RUN!
Wednesday, November 26, 2014
Happy Thanksgiving
My blocks are coming together. I have two more to sew up and may try and get to them today.
I did make yet another Sew Together bag. Instead of piecing the exterior I used a cool print and let it do the work.
Those fun fabrics from the last post found their way into this bag!
I wish all that are celebrating Thanksgiving, a happy and fun day. It is my favorite holiday that we will be celebrating on Friday instead of Thursday so all my children can be together with us. Thank you to all my readers who comment and make my day that much better every day!
Kelly
Labels: First post
Christmas blocks,
sew together bag
Friday, November 21, 2014
Christmas Shopping
 |
| oohhhh! |
So today I started Christmas shopping full force. I have picked up a couple of things here and there but not with a lot of enthusiasm.
Imagine my surprise when I found myself at my LQS, The Quilt Block, to find just the right fabric for a gift I am making.
I will be buying yardage of this one.....
Yes I like these a lot!
Kelly
Thursday, November 20, 2014
Foggy
Yesterday I spent a good part of the day working on these blocks.
The blocks are simple.
This background is a bit busy but I think in the end it will work.
This reminds me of Cindy Lou Who's ornament that falls off the tree and rolls across the floor alerting the Grinch that someone is out of bed....
None of the tops of my ornaments (the gray part) lineup, just don't look too closely.
The good thing is, I am using up my scraps. The bad things is my room is trashed!
Kelly
Wednesday, November 19, 2014
Winter Is Here!
It is freezing here today, I am not leaving the house unless absolutely necessary! I finished up my 2nd Sew Together bag. The colors feel very cheerful!
I really do spend a lot of time picking out just the right fabrics. I wanted it to be something the ladies would like. The colorful zippers are so much fun.
I had a lot of comments about the label. I didn't make it but bought them through an etsy site called, Emily Ann's Kloset. She has many designs and other things that you might enjoy. I put some fusible on the back and then stitched around the edges.
I didn't put this on mine but now wish I had! It's a place to keep your pins or needles.
I also finished off the edges of the zippers to give it a cleaner look.
I am almost out of the pin fabric but figured it was a perfect piece for a sewing bag.
This is not a hard bag to make, but you must concentrate and it is not a quick project. Once again I chose to sew down the binding around the long zipper by hand. It does not take long and I like the way it looks.
Congratulations to Longwood Gardens for the best restroom in the world award! It is fantastic and well deserved this is a must see in person if you ever get the chance.
Okay now for something fun...... last summer I did a survey on what was your favorite color, everyone seemed to like it a lot. I thought it would be fun to try and guess what the Pantone color of the year will be for 2015.
My vote is for classic blue.
Revison....go here to see the colors.........Start voting it ends 12/13/14. Go up to the right hand side of the blog and vote!
Kelly
Tuesday, November 18, 2014
Sew Together Bag for a Good Cause
Another Sew Together Bag! I am still learning some tricks as I go....This is going to be for my guild, Calico Cutters auction in December. I love this color combination! I am so glad I went with the gingham binding.
I also remembered to put in these cute little labels I bought. I will show you the finished bag tomorrow.
Kelly
Monday, November 17, 2014
A New Book
Today I received a copy of a book I have been looking forward to by Sujata Shah.
Part of my excitement is because I made a quilt for her book and it is one of my most favorites. It no longer belongs to me because I gave it to Sujata for her birthday. I know she will give it a good home.
If you like improvisational piecing, and out of the box kind of quilts, this is a book for you. Sujata gives you easy instructions to make some amazing quilts. Her colors sense is truly unique and will open your eyes to new ideas.
Congratulations Sujata, I know how hard you worked on this book and now it is a dream come true.
Kelly
Friday, November 14, 2014
The Boy
Or more precisely, the gingerbread boy. My granddaughter is calling her yet to be born brother, the boy. They are not telling anyone the name until he is born.
I am not so sure about my fabric choice as it looks a little mushy, but I am not changing it.
I inherited my grandma's button box and found these 3 red buttons that will work perfectly. I have not sewn them on yet, I like to do that once it is quilted.
So this is what I got so far.....the boy may just get changed........
I picked these up today at my LQS, the Quilt Block in Exton. The bottom one is for our December 10" block Swap, the bee fabric may make it into the new grandson's baby quilt and I couldn't resist the top one.
I also picked up these beautiful zippers that may end up in another Sew Together Bag.
On my never ending quest to find some healthy snacks, I found these at Target today. Only dried organic apples and organic cinnamon. Nice and crunchy. the perfect thing to keep you from raiding the chocolate chip bag when you come home starved (don't even pretend you haven't raided the chocolate chips)!
How many of you out there got snow last night? We were shocked when we went to bed at how hard it was snowing! We still have some in our backyard, is this a sign of things to come?
Kelly
Tuesday, November 11, 2014
Fun Sewing
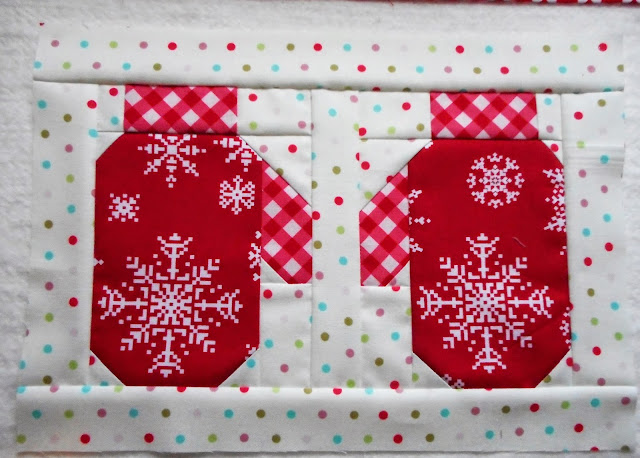
Red snowflake mittens..... and polka dots.
And then there were 4.....I am enjoying these very much.
Kelly
Monday, November 10, 2014
Peppermint Patty and a Binding Tutorial
 |
| Peppermint Patty |
Ok I promise this is the last time I will show this quilt! It is complete. The above picture is before it went into the washer and dryer. I used a red with white polka dots for the binding from my stash.
Also as a word of caution.......I washed every single piece of red fabric before I used it. Both of my Color Catchers came out very dark pink!
Two women in our guild, Carolyn and Jamie have started their own machine quilting business. So I took it to them and Jamie did a wonderful job machine quilting it. I chose an all over swirl pattern that gave me just the right density of quilting that I like.
If you are local and would like their information, send me an email.
To keep it real, I thought I would show you some of my blocks did not match up. It's totally my inexact sewing and not the pattern.
There are lots of ways to connect the ends of your binding . I bought this tool years ago and I really like it. I know you can figure it out with a ruler .......but for me this works well. Some women in my guild want to know about this so here is a tutorial.
The first thing to do is to leave a long tail on each end of your binding. See above, more is always better. There is nothing worse than to come up short and have to add to the binding.
I am right handed so my instructions will be the way I do it. Take the tail to the left and cut the end clean with a nice parallel cut.
Place the binding tool on top of the tail you just trimmed, with the arrow at the top and the edge of the tool along your newly trimmed edge.
My binding is 2 1/2 inches wide, these instruction will be for that size. There are 3 other sizes on the tool as well.
Take the tail on your right (the untrimmed one) and fold it so that the folded edge lines up with the 2 1/2" line. See above how the 2 1/2" mark just peeks out.
Trim your right hand tail off at the 2 1/2" mark.
They should look something like this.
Open out the right tail and draw a diagonal line like this. Measure down 2 1/2" on the right hand side so you know where to draw the line. You can see my dot.
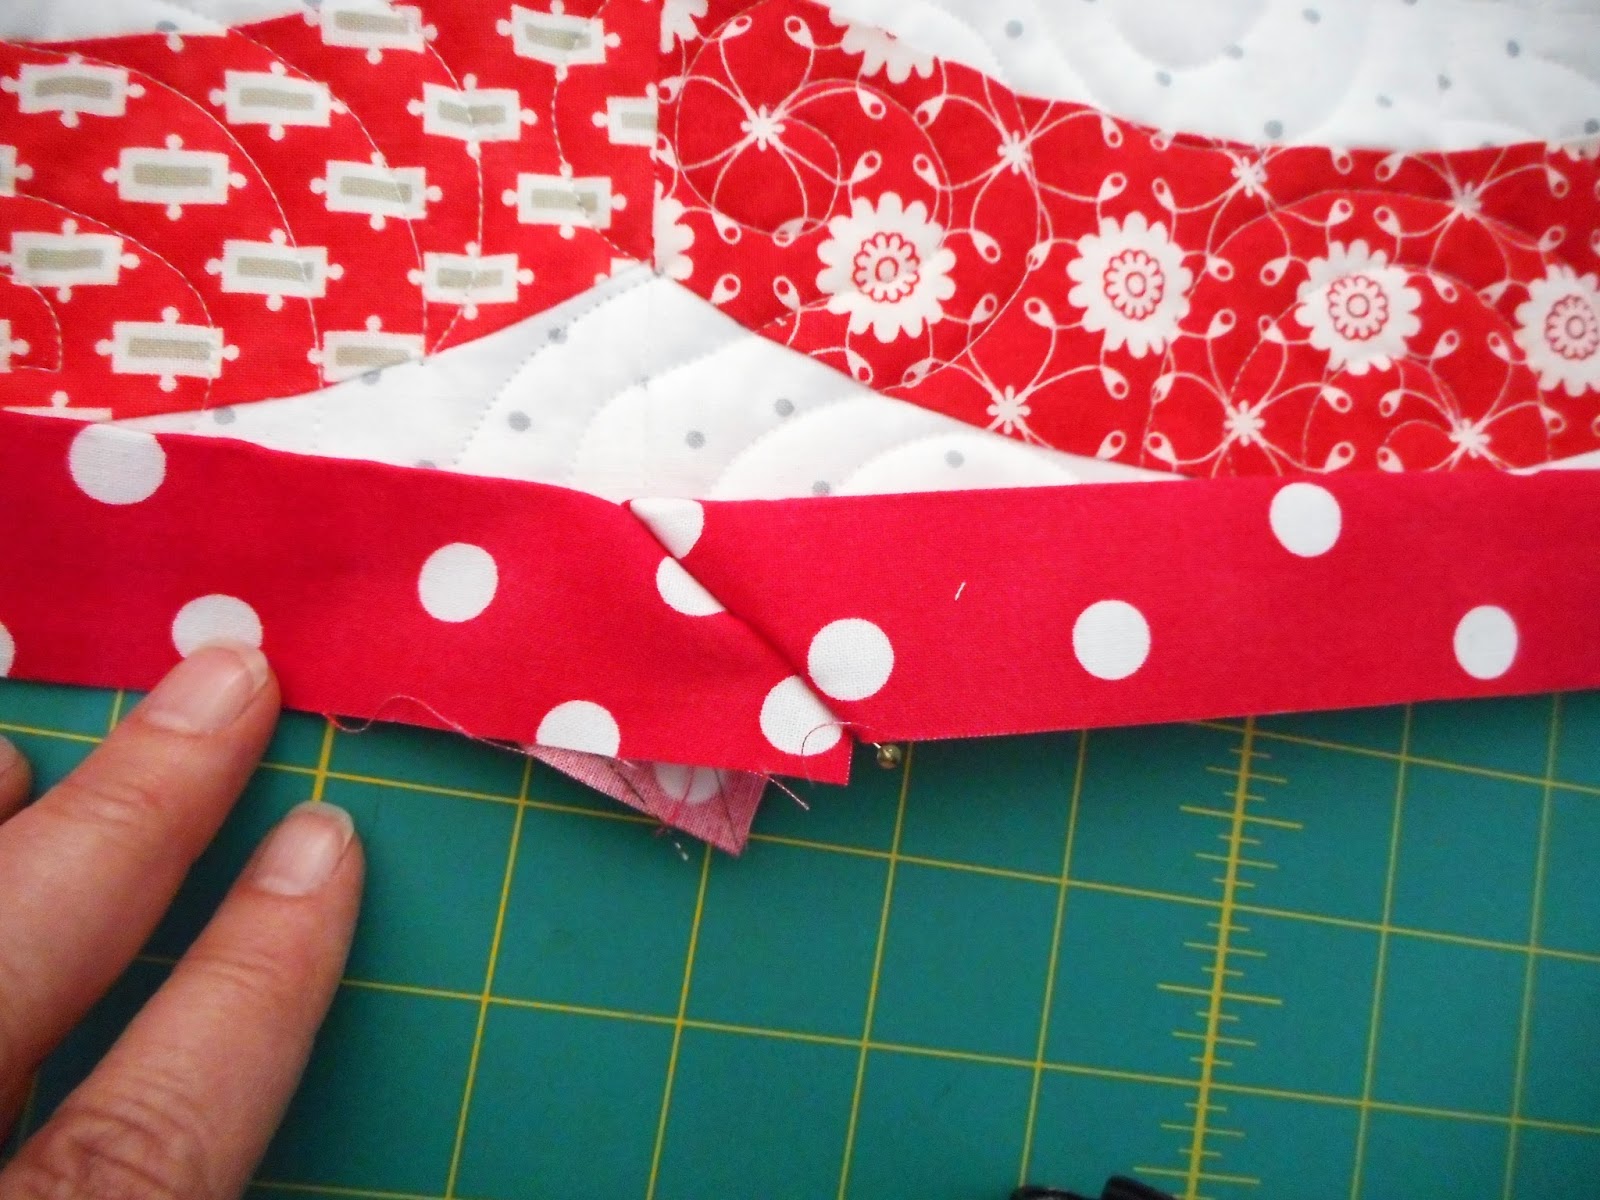
This part is a bit hard to describe....after you draw your line on the right tail, twist it by 1 turn, it will look like it is not right. You may have to do this a few times to get it right. Next line up the ends of your tails and pin right on the line. DO NOT SEW YET.
Turn it out to make sure it fits and it is not tangled up. This is easier to do than to explain. After you do it a few times it will come easy and you won't even have to think about it.
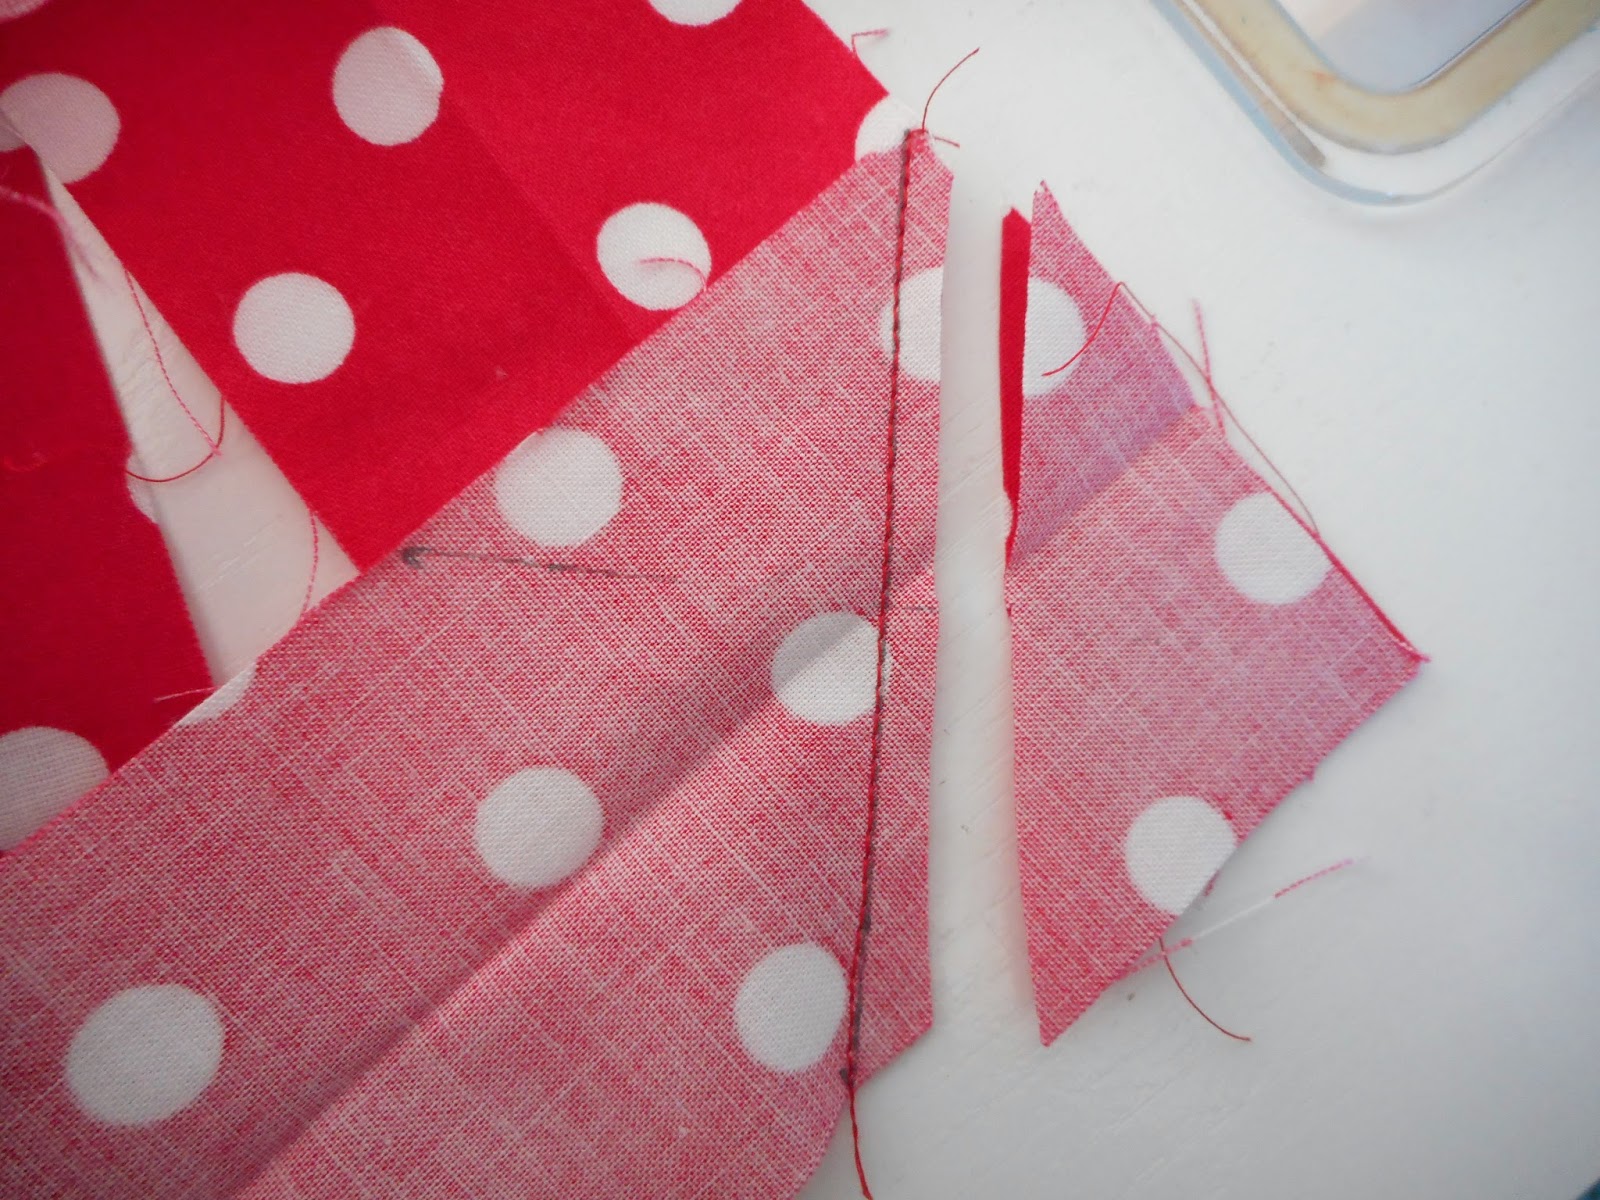
Sew on the line.....
Trim the seam and press it open.
Start sewing where you left off and you are finished with a nice neat seam that isn't bulky.
The other thing I like to do after I sew on the binding is to press it from the front. I think it helps to turn the binding and gives it a nice crisp edge.
I also press right in to those miters which sets them nicely.
I have no idea if this is the way people usually do a binding but this is how I have done mine for years and it works pretty well.
Peppermint Patty Stats:
Size about 60 x 66
Fabric from my stash
Pattern is by Sew Kind of Wonderful using their Quick Curve Ruler.
Quilting by Jamie L- email me for her information if you would like it
The best part is that it is done for Christmas!
Kelly
Labels: First post
binding tutorial,
peppermint patty
Subscribe to:
Comments (Atom)

.jpg)
.jpg)
.jpg)


