Monday, October 26, 2015
Ugh!
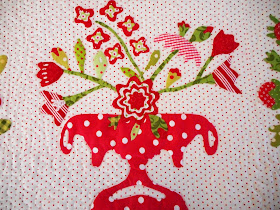
I had such grand plans. Such enthusiasm and hope. Excitement!
Inspiration!
I was even organized!
But I just wasn't feeling it. I put it all away for another day. Does that happen to you? Do you push through or move on?
I think it needs some more simmering before I go back to it.
On a much more productive note the sashing and cornerstones are complete and ready to be sewn on. When all else fails get the UFOs out!
Kelly
Friday, October 23, 2015
Tree Workshop
Wednesday I held my workshop at the Loose Threads Quilt Guild. It was so much fun and the ladies loved making the block. This was made by Stephanie before she took the class.
Here is Stephanie with her block that she made in the class. I like how she chose to do a large trunk, it makes it totally her own.
I gave everyone a pattern to work from.....
but they were free to make it their own and change up the branches.
The color choices were great!
Rosemary chose a silvery gray batik with 4 different blue backgrounds to make a wallhanging. I think the branches look very wintery.
Debby chose Amish colors. I think this is going to be very cool! I love all that contrast.
Thank you everyone for a great class and your enthusiastic appreciation of my quilts. I know I very much enjoyed my day!
Kelly
Tuesday, October 20, 2015
Beyond The Cherry Tree---check
I am so happy. This is the third UFO I checked off the list this week. It feels like a weight has been lifted.
While I do love these blocks, I don't want to make anymore. Once I realized this I had to decide what to do with them.
They are all hand appliqued so there is no way that I was storing them in a drawer.
The odd number of blocks would not make a quilt unless I made some more.......ugh, no.
It does feel like a Christmas quilt, with all the red and green.
So I will take it out every year and enjoy it for the month of December. Hopefully all my applique will hold up because at some point it will be going in the washer!
I am already cringing at the thought of someone putting a glass of wine on this.......maybe it will not go on the kitchen table.....
Kelly
Sunday, October 18, 2015
Snow!
 |
| Colorful Leaves 18" x 18" |
If you can believe it we had snow showers today! Highly unusual for this part of Pennsylvania. I feel like this might be an omen for the coming winter.
The other day I was on the phone with Betsy who is a member of one of the guilds I belong to. She happened to mention a leaf quilt she was working on. I realized this little gem was sitting around waiting to be quilted. If I waited much longer fall would be long gone.
I happen to be a person who likes a lot of quilting in my quilts. It seems like the trend is to quilt just the main parts and leave backgrounds unquilted. To me it looks droopy and baggy, not my preference.
I have seen some quilts that use a spiral where it starts in the center of the quilt. I felt this was too small for that type of quilting. So I decided to start in the corner and work my way out. I love it! It was also easy to do and gave me the look I like with lots of quilting. I just used the edge of my presser foot to do the spacing. It is not perfect but pretty darn close!
I used the triangle method to hang it. I love this method, quick, fast and done!
Another decision was the very low volume binding. At first I wasn't sure but now that it is hanging up I love it.
This Wednesday, October 21, at 9:30 I was invited to do a trunk show at the Loose Threads Quilt Guild. If you are a local and want to see my quilts (I am bringing a lot) they are located at 145 Chestnut Street Spring City PA. Come and say hi!
Kelly
Thursday, October 15, 2015
Miscellaneous Day Tutorial
 |
| Jaxon and Cameron |
I just love this picture! The are 2 months old already! Thanks to everyone who asks about them and wants to see pictures! I am happy to oblige!
While I was perusing the blogs I read, I saw this grocery tote on the blog Occasional Piece.
It recommends to use a heavy weight canvas for durability and french seams to keep the fraying in check. I love how it turned out but am not sure I will use it for groceries....
I used one of my labels to make it mine!
I came across this Judy Martin's Ultimate Point Trimmer in a drawer the other day and thought this could be a good tool to use. Now I consider myself a pretty experienced sewer but I can not figure out (even with the directions and the Youtube video) how to work it. Any tips? I just know this could help my piecing....
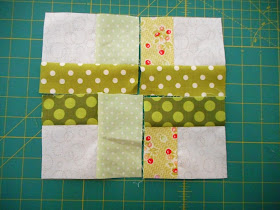
I got a bunch of emails asking me how to make the blocks for the runner I showed the other day. They are super simple so I will do a quick tutorial. First cut a square from the light fabric. The size is up to you and you do not need to make it a perfect square. In this example it is on the small side, maybe 6". The runner I made used 10" squares just to give you a reference. The larger your square the more the light fabric will show. Gather 4 strips of various widths. As you can see above they are not even totally straight, not a problem.
Sew a strip on the right side and trim even with the block.
Continue sewing on a strip moving to the right and trimming the ends.
It should look like this. Notice nothing is perfect or even.
Cut it down the center....be brave and skip the ruler.
Cut it again horizontally.
Next turn each block so the the greens are in the center and the light fabric is on the outside corners.
Like this.
Move them around.....
until you find a layout that you like. Sew them together without worrying about anything matching!
I really do not like that light green dot...
So here is a completed block. After you sew it together you will have to square it up. It helps if you start with all the lights being about the same size, 10", 12" etc. When you cut them up they will be different but the squaring up will make them pretty close to the same size. I waited until all the blocks were made and squared up the smallest block first and used that measurement to determine the rest.
As you can see mine are all different.
This quilt is the same pattern but made with about 6" light squares to start.
This is a fun "No Rules" pattern but does take some time to get it to fit together. Have fun and give it a try. Send me a picture if you make something with the pattern I would love to see it!
Kelly
Wednesday, October 14, 2015
Reboot
My computer had been having problems for the past month and making it impossible to blog and keep up with my blogs. I think the problem is now solved.
I bought these pretty fabrics at my LQS The Quilt Block yesterday. The fabrics are supposed to go with the pattern but I will most likely change that up.
I also got the book there and have yet to read it. The fat quarter is from a guild friend, thanks Lynne!
I also finished up a UFO. This was going to be a quilt as you go queen size quilt. Not anymore! Now it is the perfect size table runner.
I used up a lot of greens. Some that I was a little tired of looking at every time I searched for a green.
Now what to do with the rest of the blocks......
Kelly
Thursday, October 8, 2015
It's a Beautiful Day In The Neighborhood
Almost a year ago I agreed to participate in a house block swap that Barb organized. Today I put the finishing touches on my quilt and I am so happy with the way it turned out. Thank you Barb, Robin and Susan for great blocks!
I pretty much knew from the beginning that it was going to be put together a bit like a puzzle. I also added some birds.....
and some trees, just to make it like a real neighborhood.
I loved this one Barb made because there is always one house in the neighborhood that looks a little scary!
Robin added ric rac and I was careful not to quilt over top of it. This was her first swap and I think she did a great job!
Whenever you make a quilt without a pattern, issues are sure to arise. I had this giant big space that was too much of a hole and looked totally out of place. I did not want to take anything apart and had these hexie flowers hanging on my design wall. They practically jumped onto the quilt. I think they were the perfect solution. You know for sure there are flowers in my yard.
I had a bunch of these half square triangles leftover from the Vintage Farm Girl quilt. They worked well to fill in spaces. I won't lie, it was a lot more work but worth it in the end.
Here is a better shot so you can see all the different sized HSTs I used.
Thank you ladies, it was a fun quilt to make!
Kelly


