 |
| Jaxon and Cameron |
I just love this picture! The are 2 months old already! Thanks to everyone who asks about them and wants to see pictures! I am happy to oblige!
While I was perusing the blogs I read, I saw this grocery tote on the blog Occasional Piece.
It recommends to use a heavy weight canvas for durability and french seams to keep the fraying in check. I love how it turned out but am not sure I will use it for groceries....
I used one of my labels to make it mine!
I came across this Judy Martin's Ultimate Point Trimmer in a drawer the other day and thought this could be a good tool to use. Now I consider myself a pretty experienced sewer but I can not figure out (even with the directions and the Youtube video) how to work it. Any tips? I just know this could help my piecing....
I got a bunch of emails asking me how to make the blocks for the runner I showed the other day. They are super simple so I will do a quick tutorial. First cut a square from the light fabric. The size is up to you and you do not need to make it a perfect square. In this example it is on the small side, maybe 6". The runner I made used 10" squares just to give you a reference. The larger your square the more the light fabric will show. Gather 4 strips of various widths. As you can see above they are not even totally straight, not a problem.
Sew a strip on the right side and trim even with the block.
Continue sewing on a strip moving to the right and trimming the ends.
It should look like this. Notice nothing is perfect or even.
Cut it down the center....be brave and skip the ruler.
Cut it again horizontally.
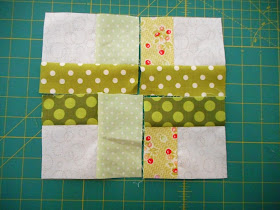
Next turn each block so the the greens are in the center and the light fabric is on the outside corners.
Like this.
Move them around.....
until you find a layout that you like. Sew them together without worrying about anything matching!
I really do not like that light green dot...
So here is a completed block. After you sew it together you will have to square it up. It helps if you start with all the lights being about the same size, 10", 12" etc. When you cut them up they will be different but the squaring up will make them pretty close to the same size. I waited until all the blocks were made and squared up the smallest block first and used that measurement to determine the rest.
As you can see mine are all different.
This quilt is the same pattern but made with about 6" light squares to start.
This is a fun "No Rules" pattern but does take some time to get it to fit together. Have fun and give it a try. Send me a picture if you make something with the pattern I would love to see it!
Kelly


Jaxon and Cameron are just adorable!1 Love the pumpkin outfits...so cute hugs, Julierose
ReplyDeleteLove those little trick or treaters. It just doesn’t get any cuter than this.
ReplyDeleteLOL, the photo of your grandsons is adorable and funny!! Thanks for taking the time to do this great tutorial!!
ReplyDeleteQue preciosos bebes !!!
ReplyDeleteen España decimos, achuchalos un poco por mi (abrázalos un poco por mi)
gracias por el tutorial
Just love those adorable little "Pumpkins"!
ReplyDeleteGorgeous little outfits. They are looking great!
ReplyDeleteGood to see your projects, too, and the tutorial.
Thanks for the tutorial! Makes perfect sense! Precious babies, too!!
ReplyDeleteOh those little pumpkins are ADORABLE
ReplyDeleteI like the bag but agree I wouldn't use it for groceries. The bag I made you is supposed to be a market bag too, but I use it for quilting stuff.
great tutorial I love the scrappy look
They are a-do-ra-ble !! And they already play with Halloween !! :)
ReplyDeleteThank you so much for the tutorial....I guess I fell in love with your table runner !! ^^
And yes, I'm certainly going to make one !!
Love those precious babes!!! Thanks for the tutorial. It looks like a really fun, no rules quilt!
ReplyDeleteWhat cutie "pumpkins"! Just adorable.
ReplyDeleteThanks for the tutorial. This one has been on my list to do since you first showed the scrappy version. Your tablerunner came out great - I like how you off-set the blocks.
As for the point trimmer - Wow, JM's tute on You Tube didn't make it too clear, did it? I've been trimming my points for years. I learned from Marsha McCloskey back when rotary cutters were brand new. Do you have one of JM's books? ( I don't know if the directions are in there either.) Basically, there are two ways to trim, depending on how the triangle is used (half square triangle OR like a flying geese block) I suggest trying both ways with some scrap fabrics to see how the trimmed points actually line up. Or just use the" C" cutting line, I guess. If I were there, I could show you how and I know you'd "get it" right away! I think it's worth the time to figure it out, because it really helps your accuracy. Hope this helps you. If not, let me know. I can send you something that might make it clearer.
Love the little tutorial. Those are great little blocks and a great way to use up strips~
ReplyDeletethanks!!
Oh I love what you are growing in the "pumpkin" patch! Great tutorial too. Those blocks are so simple but what a beautiful effect...
ReplyDelete