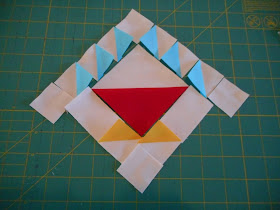
Have you ever thought about doing a Sew Along? Well how about a follow along and sew it if you feel like it? Barb from Fun with Barb and I were both thinking about doing some basket blocks. We thought maybe some others might be interested too. With the holidays right around the corner we all have many, many commitments and want this to be a fun thing. No stress just sew if you want.
My blocks are 5" finished and Barb's are a bit bigger. You can make it any size you want but you will have to do the math! Remember this is a 5 patch so a 5", 10" or 15" is easy to convert but anything else will require a calculator, at least for me! Press after each step for a nice looking block.
For a 5" finished block these are the instructions. From your background fabric cut:
(1) - 4" square
(4) - 2" squares
(4) - 1-1/2" squares
(2) - 1-1/2" x 2-1/2" rectangles
Next decide what colors you want you want to use. For my basket I used the following, the blue squares for the handle, the basket the red square and the feet the orange square.
Basket (red) cut (1) 4" square
Handles (blue) cut (3) 2" squares
Feet (orange) cut (1) 2" square
Layer your 4" squares right sides together and draw a line on the diagonal as shown.
Sew a quarter of an inch from each side of the line as shown above.
With your rotary cutter slice it in half.
Press to the dark side. You will have an extra half square triangle that you can save for another basket.
Take a square ruler with a diagonal line and put it right on the diagonal. Square up your block to measure 3-1/2". This is the best way to get a perfect square and save you the agony of a wonky block.
Now take the 2" squares and pair them up with the handle squares and the foot square. Do the same thing, draw your diagonal line and sew on each side with a 1/4". Trim these up to measure 1-1/2".
They should look like this. Red block measures 3-1/2" and the smaller ones should measure 1-1/2" square.
Lay out the block making sure your handle is going in the correct direction. This is easy to mix up so don't skip this step.
Press one foot with the 1-1/2" x 2-1/2" strip and press toward the background strip.
Sew it to the side of the basket and press towards the basket.
Next do the other side adding the 1-1/2" square to the end, as shown above. Press towards both background pieces.
Sew it to the other side and make sure to snug in those seams to make it fit and press towards the basket.
Next sew the handle together as shown above. Press the 1-1/2" square away from the half square triangle. The triangles will want to go in one direction, press them the way they want to go. Once you have attached this strip to the basket press towards the basket.
Do the other side, again pressing away from the triangles and you are finished!
I am already thinking of all the possible color combinations. Mine are going to be in solid hand dyes, Barb is doing reproductions. It will be fun to see how different they look.
Be sure to let me know if you give it a try!
Kelly


Kelly, your instructions are very easy to follow and I love that you include a little extra fudge room on the hsts! I always make mine that way.
ReplyDeleteNot sure what fabric I'm going to use but I'm tempted to go BOLD... Maybe Kaffe Fasset! And I might put some flowers inside the basket, just for fun!
Thanks to you and Barb for taking the time to post this.
Great tutorial Kelly ! Thank you !
ReplyDeleteEvery year in January, I hosted a SAL and this next year will be.... baskets !!
I will post my size and steps tomorrow.
ReplyDeleteYours are so cute in this size. I like that you are using 3 colors instead of 2
I just realized that I have an unfinished basket quilt in 1930s reproductions. This sew along would be the perfect time to finish it. Can it count? Your hand dyed baskets are beautiful. It will be fun to see more color as you finish each block.
ReplyDeleteThanks for writing the tutorial! I might have to do just a few. Your blocks look great!
ReplyDeleteLove the baskets! Love the solids - my favorite. So crisp & bright!
ReplyDeleteGreat tutorial and fun fabric choices. I am looking forward to seeing these in the future.
ReplyDelete