Thursday, October 26, 2017

Baby Basket Tutorial


Have you ever thought about doing a Sew Along? Well how about a follow along and sew it if you feel like it? Barb from Fun with Barb and I were both thinking about doing some basket blocks. We thought maybe some others might be interested too. With the holidays right around the corner we all have many, many commitments and want this to be a fun thing. No stress just sew if you want.

My blocks are 5" finished and Barb's are a bit bigger. You can make it any size you want but you will have to do the math! Remember this is a 5 patch so a 5", 10" or 15" is easy to convert but anything else will require a calculator, at least for me! Press after each step for a nice looking block.


For a 5" finished block these are the instructions. From your background fabric cut:

(1) - 4" square
(4) - 2" squares
(4) - 1-1/2" squares
(2) - 1-1/2" x 2-1/2" rectangles


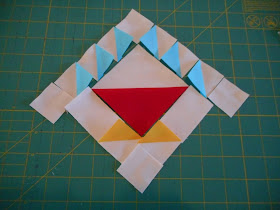
Next decide what colors you want you want to use. For my basket I used the following, the blue squares for the handle, the basket the red square and the feet the orange square.

Basket (red) cut (1) 4" square
Handles (blue) cut (3) 2" squares
Feet (orange) cut (1) 2" square


Layer your 4" squares right sides together and draw a line on the diagonal as shown.


Sew a quarter of an inch from each side of the line as shown above.


With your rotary cutter slice it in half.


Press to the dark side. You will have an extra half square triangle that you can save for another basket.


Take a square ruler with a diagonal line and put it right on the diagonal. Square up your block to measure 3-1/2". This is the best way to get a perfect square and save you the agony of a wonky block.


Now take the 2" squares and pair them up with the handle squares and the foot square. Do the same thing, draw your diagonal line and sew on each side with a 1/4". Trim these up to measure 1-1/2".


They should look like this. Red block measures 3-1/2" and the smaller ones should measure 1-1/2" square.


Lay out the block making sure your handle is going in the correct direction. This is easy to mix up so don't skip this step.


Press one foot with the 1-1/2" x 2-1/2" strip and press toward the background strip.


Sew it to the side of the basket and press towards the basket.


Next do the other side adding the 1-1/2" square to the end, as shown above.  Press towards both background pieces.


Sew it to the other side and make sure to snug in those seams to make it fit and press towards the basket.


Next sew the handle together as shown above. Press the 1-1/2" square away from the half square triangle. The triangles will want to go in one direction, press them the way they want to go. Once you have attached this strip to the basket press towards the basket.


Do the other side, again pressing away from the triangles and you are finished!


I am already thinking of all the possible color combinations. Mine are going to be in solid hand dyes, Barb is doing reproductions. It will be fun to see how different they look.
Be sure to let me know if you give it a try!

Kelly

Friday, October 20, 2017

Another Post This Week!


My Painted Forest quilt is complete! I so enjoyed making this quilt and am so happy with my color choices. Most of the fabrics are Alison Glass, mixed lines. The designer of this pattern is Blue Nickels Studio. My only advice is to over size (about 1/2") the blocks so you can trim them down to the perfect size.


I have had this backing fabric in my stash forever and decide it was time to use it. The best part was there was no piecing!


I did very small not quite straight line quilting from edge to edge (horizontal) and love how it turned out. I will be honest I held my breath that it would not be wonky on the edges. I used invisible thread and my free motion foot. I really don't like the invisible thread  that much but I did not want the thread lines to take away from the colors. I love the sketchy binding and feel it adds to the quilt.


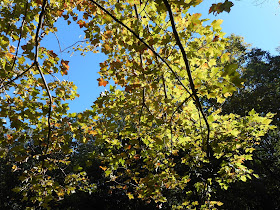
Fall colors are not quite here yet but I do love the sun shining through the leaves and the beautiful colors they do make. I feel like it is so fleeting so every day I have to go outside before they are gone. My camera does not capture it, go outside tomorrow and see for yourself!


Continuing with my leaf/fall theme..... Here is a maple leaf I painted the other night. I am so happy the way it turned out and it is giving me confidence to keep going. Even the ones that don't turn out are fun and exciting. Experimenting with colors is always fun. There is always a lesson to be learned. Maroon is probably one of my least favorite colors but I never could have painted this without moving towards that color. I also just read that the older we get the more we dislike orange....I wonder why?


So I have this book called Everyday Watercolors by Jenna Rainey and I am doing all the lessons. They are quick and don't take long, anywhere from 15 minutes to and hour. It's addictive!


So far it is fun but I do have to work at it. I think I will keep going but for right now it is back to the sewing room!
Can you believe it? Two posts in one week!

Kelly

Monday, October 16, 2017

Autumn is Finally Here!


I love fall and it goes by way too fast. I was talking with someone the other day and we were both saying that Autumn is the busiest time of the year. Maybe because it is so nice out and you know you the days are numbered until the cold is here. This little arrangement is behind my kitchen faucet.


I used to go all out for Halloween but now only put out a few things. It makes me focus on the few things I have and is a snap to clean up! This is on the counter and every few days I change out the leaves. They are about due.


 The other thing I am doing is painting! I am in love with watercolors and am exploring many You tube videos and books at the library It is something I know nothing about but am having fun. This was my second try which is much better than the first.


Don't worry I am not giving up quilting, never! My stash won't allow it......


These trees were made in a class with Cindy from our Calico Cutters Quilt guild. I have been undecided about how to quilt it and just jumped in and am doing matchstick quilting with INVISIBLE thread. I have never used it. The jury is still out but I did not want to see lines on my dark or light fabrics I am so afraid it will be distorted, but too late now!


For inquiring minds.....the Downingtown Library is holding a fun raiser in the spring. They are looking to show that quilts are not only for beds but can be art too. This one is a little out there but I do like it! It is called Polygons by Jennifer Sampou. It is fun and quick and I love straight line quilting especially on small things (see above (-:). They will be putting the quilts up between now and April, so stop by to see them!


I totally forgot I had this "checkout card" fabric and ended up using it for my sleeve. I might just have to make another....


One of our guild members is moving away next month. Jean had a sale of all the things she cannot take with her. This is all but done so I am going to finish it for a another quilt raffle coming up in the spring.


This is why I haven't blogged in such a long time. I could not figure out how to find my pictures! Oh my gosh I feel like it was so easy before, why couldn't they leave it alone? Today I spent 3 hours going through this book to try and figure it out. I could barely do it......it feels so clumsy. I think I have it but now to edit them......Hopefully I will be back soon and in a more regular schedule!

Thank you to everyone who emailed to wonder if I was OK! It's nice to know I was missed.

Kelly