My guild holds a demo meeting usually every February. It is a chance to have members show other members a technique, how to use a tool or how to make something. This is my demo.
First you pick out some selvedges and I like to have at least 3/4' of fabric on the edge, you can go smaller but it won't show up as much. I am color coordinating mine but scrappy is good too.
Iron them, you will thank yourself when you are trying to sew them down, plus it makes them look nice too.
Cut a piece of scrap fabric (this will not show) the size of your desired pin cushion. I want mine big so I am cutting it 11 x 11. This will be big enough to sit on the arm of a chair or couch without falling off. Whatever size you pick, cut this piece out about an inch larger than yor finished size.
Cut a strip of fabric 1 1/2" wide and a little bit longer than the width of your scrap fabric. Line the bottom of this strip up with the bottom of the scrap fabric.
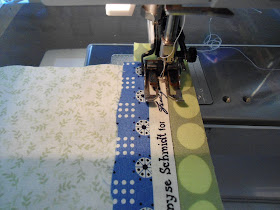
Next place your first selvedge strip on top of this making sure to cover the edge of the first strip with the selvedge part of the strip.
Continue in the same manner until you fill up the entire square. They don't have to be completely straight, unless that is what you want.
For the last strip be sure that you have ample fabric to cover your square (see the dark blue fabric). You don't want the selvedge right at the top or it will be all stiff when we sew this together.
Turn it out and press it making sure to press the open 3" edge good, to give you a nice seam allowance.
I used crushed walnuts shells for a filling, you could also use sand. The crushed walnut shells are available at pet stores in the reptile section!
A funnel helps tremendously! Do not stuff it too tight, there should be a little give so it will take the shape of whatever you put it on.
To make the flower, layer 2 fabrics with batting and just machine quilt a circle and fill it in. Easy!
Glue them down with some liquid stitch.
There you go! Below are some that I made for friends in different colors.
Have fun with this!
Kelly


Kelly,
ReplyDeleteGreat tutorial! I am not seeing any pictures of the process.
Is that intentional?
Your pincushions are so pretty! I have a selvedge pinnie but I'll make a flower to go with it, that's the finishing touch that makes yours extra special.
ReplyDeleteSuper, super cute! I love those flowers.
ReplyDeleteThanks for the warning about the pens. Great idea for a selvedge project.
ReplyDeleteKelly, these are great! I especially like the flower. Thanks for sharing!
ReplyDeleteThese look great, and I love the size, Im always loosing my little pin cushions in my mess :)
ReplyDeleteYour pin cushions look great.
ReplyDeleteLovely gift ideas!
Great tutorial and so cute!! Wow, Thanks!
ReplyDeleteI'm looking forward to Wednesday. I think it was a great tutorial.
ReplyDeleteDebbi F.
Love the step by step tutorial. I may have to keep some selvedges for myself!
ReplyDeletesuch a cute selvage project!
ReplyDeleteMakes me want to get mine out again and make something.
Thanks for the toot!
Cute idea. Do you know if you can heat walnut shells? If so, you could make mini heating pads. Loretta
ReplyDeleteYou can make the heating pads with rice or dried beans.
ReplyDeletelove the flowers & leaves!
ReplyDelete& did you know that those frixon pens come back if its very cold - so if you put your fabric in the freezer the lines will come back.