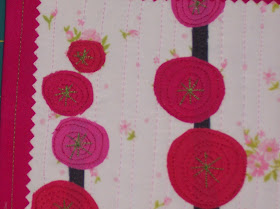
I wanted to use the fabrics I dyed and decided this was a good opportunity. I also added some other fabrics to make it a little more interesting.
Do yourself a favor and quilt the background before you put the fused pieces on. I chose straight lines as I like the simplicity of it.
If you have an idea start cutting out shapes and lay them on the background. If you don't have an idea still cut up shapes and start laying them down, one will come to you!
Once you have your design (don't fuse it yet) decide how can you machine quilt this as easy as possible and take away the pieces that will be in the way. I took the flowers and leaves off, quilted the stems, the leaves and then the flowers. If needed take a picture so you remember what the design looks like!
Here is a close up of the leaves and a little bit of the flowers.
I also added a green star in the center of the flowers because they looked a little flat.
Next I cut them out 1 inch wide and used my pinking shears, you could also use another type of decorative scissors.
Let them cool and fold in half with the fused sides together, the paper is still on.
Remove the paper. Place the quilt edge inside that fold and fuse carefully. Trim edges evenly with quilt.
Cut the side pieces and inch longer than the edge. I placed this on my applique pressing sheet in case I got the iron on the fusible and got it all over the ironing board. Press the strip in the middle leaving about 2 inches or so free on the edges.
Trim about a 1/2 inch off as shown above.
Press the edge over the first binding you put on.
Next edge stitch all around the binding to keep it in place. Here is also a better close up of my flower centers.
My porch furniture is all done! I love it and Dylan did a great job. A paint sprayer is a wonderful thing! I think it looks modern yet classic at the same time.
Kelly


I love hollyhocks but they always look awful when I try to grow them...yours look awesome! Thanks for the tute full of ideas. Oh, and I love your porch and freshen up furniture, Kelly!
ReplyDeleteI like that binding technique. Thanks for the tute.
ReplyDeleteGreat mini.
ReplyDeleteLove the furniture. Black was a good choice.
How cute it looks like hollyhocks to me. I love the pink and green!
ReplyDeletethe porch furniture looks fabulous you must be thrilled with it!
Oh, wow! The furniture looks fabulous and the cushions are marvellous.
ReplyDeleteI like your mini-quilt and it was a very helpful tutorial; lots of good hints for a novice like me!
Thanks for such an interesting project idea! My sister loves hollyhocks so this would be a cute little gift for her.
ReplyDeleteYou have been BUSY, girly. I love the hollyhocks and think you did a great tutorial. The furniture looks great.
ReplyDeleteI had been thinking about going to Kutztown also, but didn't make it. Looks like fun.
how I wish I was sitting there just appliquéing away
ReplyDeletelooks like a great space to hang out in. The furniture looks wonderful, you should be happy!
I love this little quilt yup says hollyhocks to me what fun and the fact that you dyed the fabric extra special, do you need my address???
Kathie
You are inspiring me to get going on the challenge...NEXT week! duty calls first. Love the 'new' wicker.
ReplyDeleteThe furniture looks terrif. And I just adore those hollyhocks with your very own hand dyed fabrics. Tres' cool, girl.
ReplyDeleteYour porch is gorgeous! Oh what I wouldn't give for a space like this. I hope you spend lots of time in it, reading, stitching, hand-piecing. It looks so relaxing.
ReplyDeleteWhat an "ah=ha" moment when I saw your binding method. Thanks for sharing!!!
ReplyDeleteGood Morning, I just stumbled on your site....I love this project! The hollyhocks are beautiful! I have a question...I am new to quilting so this may be dumb but....if you quilt the background first how would you make this into a bigger quilt? and did you pull your threads to the back or do you backstitch at the ends of each piece as you appliqué?
ReplyDeleteI'm late in finding your site, but so glad I did. Love the hollyhocks and your furniture looks fantastic. I'm planning on doing the same to our sun room furniture and feel very confident now after seeing how terrific yours looks.
ReplyDeleteLooks great
ReplyDelete